
| Photo Information All of the pre 2003 photo's on these pages were taken with 35mm Pentax SLR's. Over the years I have owned: K 1000's, an MX and lately a PZ-1P. I have never had any use for in camera light meters since the early 80's and so have used a Gossen luna pro F for incident readings. In recent years a Pentax digital spot meter has been used in conjunction with the "zone system" Over the years I have used the following lenses: Colour Film:
Black & White Film:
Computer Information In Janurary 2003 I purchased a Nikon Super Coolscan 4000 film scanner. This scanner is performing better than I could ever have hoped for. Many "unuseable" negs now scan quite well. Over time I may rescan some of the better Photo Gallery pics and all new pics posted to the site will be from the Nikon scanner. The site is created in Adobe GoLive 6 html authoring program, when you have lots of time and are interested in total boredom you can handcode (which I have done) but when you have a lot of stuff to put up, a html authoring program is the only way to go. IMHO. In 2016 I started the process of converting the website to Adobe Dreamweaver. |
| Since the advent of digital imaging there has been much discussion as to the ethics of manipulating a photograph. As a person presenting digital photographs in an historical forum, I think it is appropriate to give you, the viewer of these pages, my thoughts on the matter.
Below are 3 pictures and I will coment on them each. |
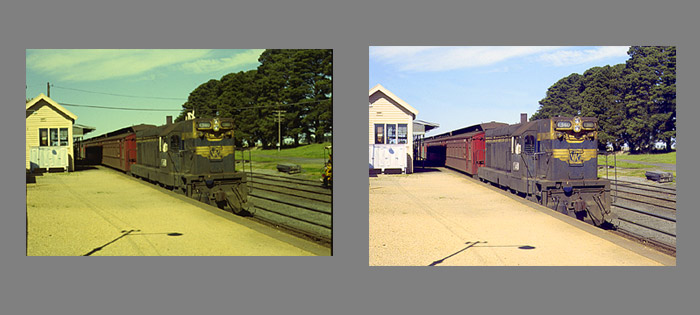 |
| The pic on the left is the raw scan. It is from a 1978 colour negative and displays some radical color shifts from the original scene. The pic on the right is after about 2 minutes of manipulation in Photoshop. Dust has been removed, the color has been balanced to approximately "normal" and the image straightened and cropped, nothing else has been changed. This is the sort of treatment that any pic appearing in a modern book should undergo. Any modern book or website that has pics with color casts is substandard and the publisher or website designer needs to get a clue. |
| . |
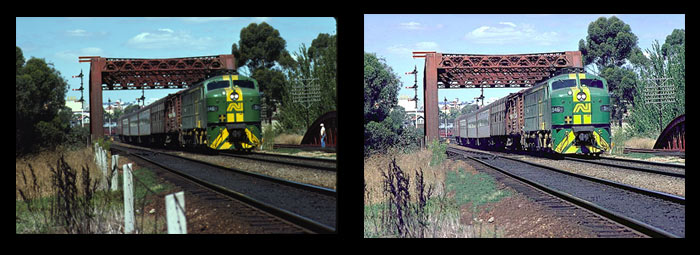 |
| This picture has undergone the normal enhancements BUT it has also been altered in such a way as to be historically misleading. The deletion of the fence, whilst an asethetic improvement make this photo historically worthless. None of the photos on this website have been altered to such an extent. You have to watch out for this sort of "improvement" as it is becomming commonplace in all media. |
| . |
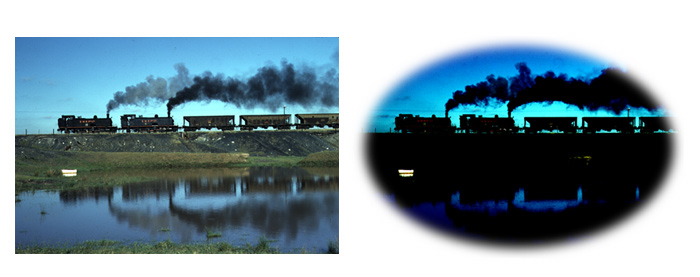 |
| Manipulations on this scale are so radical that there is no mistaking them. Actually, in an historical context, this manipulation is fine as nothing was added or subtracted.. This manipulation creates a "mood" that was absent when the original pic was taken but apart from that nothing has been changed. |
|
Scanning Information Several people have asked for information about my scanning techniques. The first thing to understand is that flatbed scanners, even with transparency adaptors, are not going to produce the best scans, they simply do not have the "dynamic range" that a dedicated film scanner has. I normally scan a 35mm slide or neg. full frame at 400% at 400ppi, (pixels per inch) If I am only scanning a portion of the film I scan at about 800ppi at about 1200%. Remember that % must be increased otherwise the scan will be 100% of a 35mm area, too small for any use except a thumbnail. In Photoshop I then reduce the image to 72ppi (with resampling turned off) and then after turning resampling back on I change the width to 700 pixels. I find that scanning at 400ppi captures much more information than scanning at say 100 or 200ppi. Scanning at a higher ppi only increases file size with no increase in quality for web use. To scan for a publication however I would need a much higher dpi. Below is my procedure in Photoshop 7 for getting a raw scan ready for the web. |
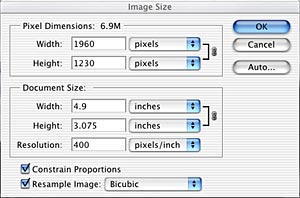
This is the image size dialog box from a raw scan that was scanned at 400% and 400ppi |
| . |
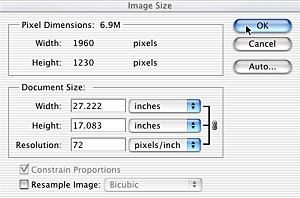
The first step is to uncheck the "resample image" check box, then change the resolution to 72 pixels/inch, then hit OK. |
| . |
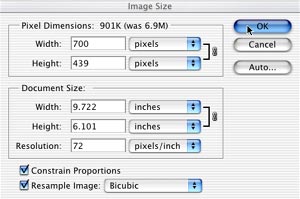
Lastly, bring the image size dialog box up again, check the "resample image" check box and change the pixel dimensions to the size you want for web use, most of the pics on this website are 700 pixels wide. Hit OK and your image is ready for jpeg compression and the web! |